HOWTO: Updating to Zetafax version 17.1
Print
ZTN2125
This Zetafax technical note applies to:
- Users updating to Zetafax version 17.1
Summary
This document describes how to update a Zetafax installation to version 17.1.
More information
Upgrade license
To upgrade an existing Zetafax system running Zetafax 2014 or earlier, you will require an upgrade license number for Zetafax version 17. This has the following format:
· U1234567-V17USER10-ABCDEF
The upgrade license is usually supplied with the download link, and must be unique for each Zetafax system (starter license). If you have not received an upgrade license number for your system then you should contact Equisys or your Zetafax distributor to obtain this before starting to install the upgrade.
To upgrade an existing Zetafax system running Zetafax version 17.0, no additional upgrade license number is needed.
Updating an installed version of the Zetafax Server
If you are updating a previously installed version, please follow the procedure outlined below, if you are upgrading from Zetafax 2008 or earlier please review technote ZTN1959 for further information.
- Shut down the Zetafax Server or stop the Zetafax Server service with the Services applet in Control Panel.
- Run the installation program (Welcome.exe) from your download version ZetafaxInstallSet.exe which will automatically extract and run the setup program.
- From the setup program select Install Zetafax and then Zetafax Server to begin your installation.
- If you are updating to version 17.1 from an existing version e.g. v17.0, v2014, v2012, v2011 you will be asked if you wish to upgrade the Zetafax Server. Click ‘Yes' to confirm that you do and click ‘Install’ to start the upgrade process.
- Enter the upgrade license number, then click “Next” and then “Install” to start the upgrade process. The upgrade should then run and complete without further user intervention.
- When you click Finish, your new Zetafax installation is ready to be registered. To do this, you can start the Zetafax Server; this will automatically prompt you to register your copy of Zetafax with our online registration service.
Online Registration
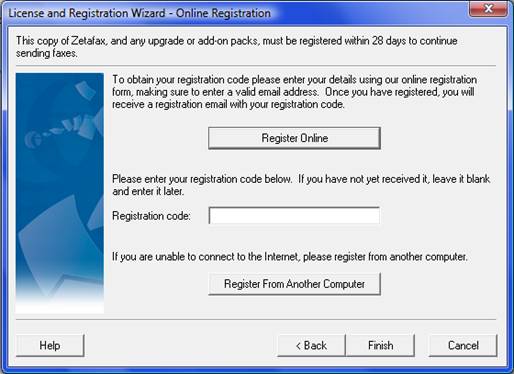
Registration must be completed within 28 days to be able to continue sending faxes. You will be prompted to register your copy if you have not done so, this will open up the License and Registration Wizard, it offers you two methods of registering depending on whether the machine you are using has an internet connection. If the machine lacks access to the internet it is possible to register your copy of Zetafax from another machine.
Register Online
- Click the Register Online button.
- Add the Company name and select the “Register” button, the Product Registration Page should open already populated with the license key details.
- Add any remaining missing details and when finished click the “Register” button, your registration code will be emailed to the email address provided on the registration page.
- Enter this registration code into the License and Registration Wizard, select the “Finish” button to complete your registration process.
Registering from another computer
To register your copy of Zetafax from another computer, select the Register From Another Computer button. This will open up a dialogue box containing the details necessary to perform a registration from another machine, copy these details and follow the instructions from a computer with internet access.
Upgrading the Zetafax Client
Once the server is updated, you are ready to update the Zetafax clients. To do this, log on to each user's PC as the network administrator and ensure the Zetafax Client is not running. Open windows explorer and browse to the network share for your Zetafax Server, open the “SYSTEM” sub-folder and run the “wksetup.exe” program. If you have an existing version 9 or later Zetafax Client the install will detect this and ask if you wish to remove the old installations before installing the new Zetafax Client Applications install; if you click “Yes” and then follow the installation wizard, the install will then run and complete. If there is no existing Zetafax Client on the machine, or a version 8 or earlier Client, then the install will simply install a new Client.
Group Policy
The Zetafax Client Applications can be rolled out using Group Policy for both updates and new installs. Please consult the online help documentation for advice on how to do this.
Upgrading the Zetafax Exchange Connector for Exchange
There are two parts to the Zetafax Exchange Connector for Exchange 2013 or later. The first part is automatically installed on the Zetafax Server machine as part of the Zetafax Server install. The second part is installed on the Exchange Server machine.
To install the Exchange Server part of the connector, please do one of the following:
- Install the connector using the Zetafax Exchange Connector for Exchange installer by following the installation guide
Or
- Install the components manually by following ZTN1956-HOWTO: Manually Installing Exchange Server-Side Components
Upgrading the Email Gateway
The Zetafax Server installation program now includes the Zetafax Email Gateway files.
As a result, the Email Gateway is automatically upgraded when the Zetafax Server is upgraded.
Upgrading the Zetafax Outlook Extensions
The Outlook Extensions are now included in the Zetafax Client Applications combined installer. There is no separate installer. The Zetafax Client Applications installer also upgrades the custom Outlook forms as appropriate.
Upgrading the Zetafax Web Client
On the server hosting the Web Client, run the install program from the Zetafax product download. During the install, you are prompted to re-enter the account name and password created when you installed the earlier version of the Web Client.
Upgrading Zetafax Notebook Installations
To upgrade notebook installations (having already upgraded the main Zetafax Server) Insert the (new) Zetafax CD or product download onto the machine.
- Connect the notebook PC to the network and run Setup.exe from the Zetafax download. The install detects the notebook install and updates it.
- Once the update is completed, upgrade the Zetafax Client (see section on Upgrading the Zetafax Client above).
Upgrading Zetafax API applications
If your Zetafax API application uses ZFAPI32.DLL, ensure that your application loads the updated version of the DLL installed with the updated Zetafax Server. If your application links statically to the API library (ZFAPIS.LIB), you should recompile your application and link to the updated library file, which is also installed with the updated server.
Upgrading the Zetafax SMTP Server
On the server that has the SMTP Server installed, run the install program from the Zetafax product download.
References
ZTN2124-INFO What is new in Zetafax version 17.1
Last updated: 14th June 2017 (NT/GW)