HOWTO: Setup an Audiocodes Mediant 500L with Zetafax
Print
ZTN2111
This Zetafax technical note applies to:
- Zetafax version 2014 or later for
- Zetafax FOIP SR140 Edition Connector
Summary
This document will describe the steps required to configure an AudioCodes Mediant 500L gateway to work with Zetafax and the Fax over IP connector.
More information
Ensure you have connected the power supply, BRI line(s) and LAN via an Ethernet connection.
To configure your Zetafax system, there are two simple stages. The first stage is to configure your Audiocodes media gateway. Once this has been completed you can proceed to the second stage configuring your Zetafax server.
Step 1: Setting the IP Address
By default the AudioCodes gateway is configured with the IP address of 192.168.0.2. This IP address will most likely need to be changed to fit into your existing infrastructure. The AudioCodes media must be set with a static IP address.
To assign an IP address using the Web interface
1. Disconnect any network cables from the device.
2. Connect Port 1 (left-most LAN port) of the device directly to the network interface of your computer, using a straight-through Ethernet cable.
3. Set the computer’s IP address to 192.168.0.4/24.
4. On your computer, start a Web browser and in the URL address field, enter the default IP address of the device; the Web interface's Login screen appears
5. In the 'User Name' and 'Password' fields, enter the default login user name "Admin" (case-sensitive) and password "Admin" (case-sensitive), and then click OK; the device's Web interface is accessed
6. Open the Multiple Interface Table page (Configuration tab > VoIP menu > Network submenu > IP Interfaces Table).
7. Select the 'Index' row corresponding to the "OAMP + Media + Control" application type, and click Edit.
8. Change the IP address, subnet mask, and Default Gateway IP address to correspond with your network IP addressing scheme (e.g., 10.8.6.86).
9. Please select Device Actions and Reset from the top of the page. This will burn the changes and reboot the Unit.
10. You can now plug the unit into the main network and reconnect to the unit through the web interface.
Step 2: Configure Audio Codes Gateway
Note:Please ensure that the Advanced view is selected which displays all menus pertaining to a configuration tab.
You must click the burn option to save the changes to the unit. If you do not burn the settings to the gateway when power is lost, the settings will also be lost.
Configure TDM Bus Settings
To configure the TDM Bus settings:
1. Open the TDM Bus Settings page (Configuration tab > VoIP menu > TDM submenu> TDM Bus Settings).

2. Configure the parameters as shown in the image above:
· PCM Law Select: ALaw
· TDM Bus Clock Source: Network
3. Click Submit to apply your changes.
4. Click on the ‘BURN’ option at the top of the web page to save changes to flash memory.
5. Reset the device. Select Device Actions and Reset from the top of the page. This will burn the changes and reboot the Unit.
Configure Trunk Settings
To configure the trunks:
1. Open the Trunk Settings page (Configuration tab > VoIP menu > PSTN submenu >Trunk Settings).
2. Select Each ISDN line used and enable the trunk by selecting the ISDN Type. Configure the trunk parameter as shown below.
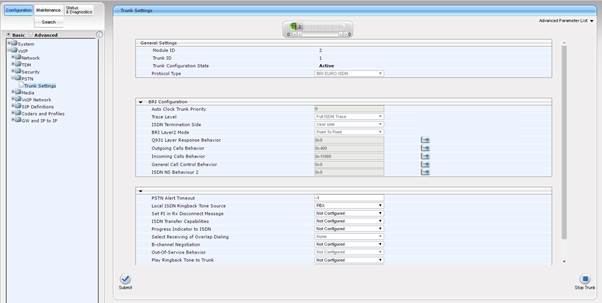
The port should go green to indicate the ISDN is connected and configured correctly. If the port remains red, please check the correct ISDN options have been selected and that the ISDN signal is present on the port. If the port remains orange, please check the ISDN settings then click Submit.
3. Click the Apply Trunk Settings button to apply the changes to the selected trunk.
Note: You are required to stop the trunk by clicking on the ‘Stop Trunk’ button in other to make any changes.
6. Click on the ‘BURN’ option at the top of the web page to save changes to flash memory.
Configure Fax and Modem Parameters
To Configure the Fax and modem parameters:
1. Open the Fax/Modem/CID Settings page (Configuration tab > VoIP menu > Media submenu > Fax/Modem/CID Settings).
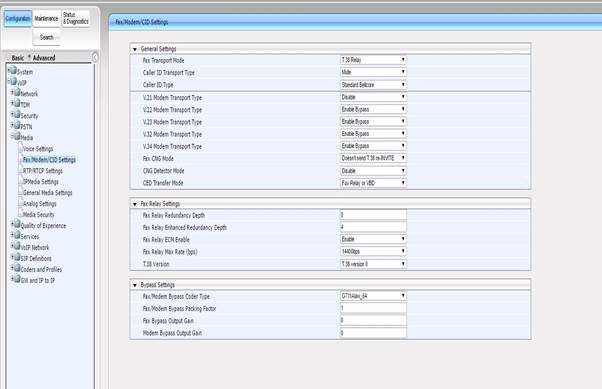
2. In the ‘General Settings’ section, from the Fax Transport Mode dropdown list, select T.38 Relay
3. From the V.22 Modem Transport Type dropdown list, select Enable bypass
4. From the V.23 Modem Transport Type dropdown list, select Enable bypass
5. From the V.32 Modem Transport Type dropdown list, select Enable bypass
6. From the V.34 Modem Transport Type dropdown list, select Enable bypass
7. Click Submit to apply your changes
8. Click on the ‘BURN’ option at the top of the web page to save changes to flash memory.
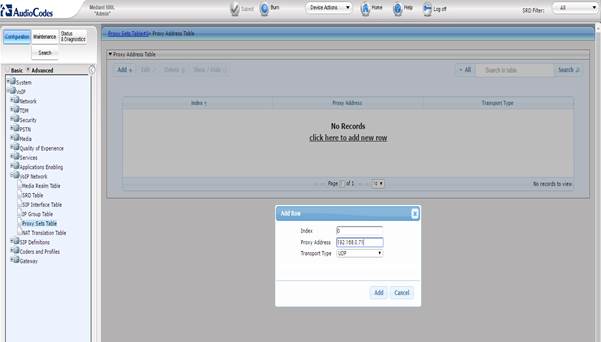
Configure Proxy Sets Table
You will need to configure your AudioCodes gateway to communicate with your Zetafax Server. The Audiocodes gateway is configured to route all traffic to the Zetafax server. This means that all calls presented to the device via the ISDN lines will be presented to the Zetafax server.
1. Open the Proxy Sets Table page (Configuration tab > VoIP menu > VOIP Network > Proxy Set Table).
2. In the ‘Additional Configurations’ section, click on ‘Proxy Address Table’
3. In the Proxy Address Table Screen, select Add
4. In the 'Proxy Address' field, enter the proxy address as the IP address of your Zetafax Server
5. From the ‘Transport Type’ drop down list, select UDP.
6. Click Submit to apply settings.
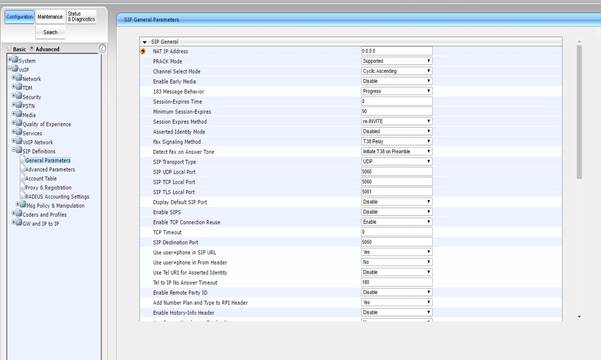
Configure SIP Definitions
To configure SIP General Parameters:
1. Open the SIP General Parameters page (Configuration tab > VoIP menu > SIP Definitions submenu > General Parameters).
2. Configure the parameters as required. From the ‘Fax Signalling Method’ drop down list, select ‘T.38 Relay’.
3. Click Submit to apply settings.
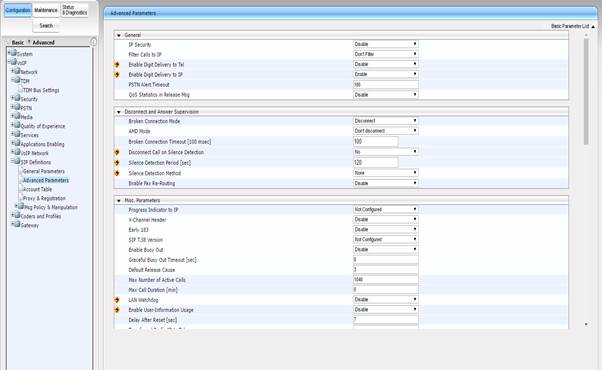
Configure Advanced General Protocol parameters
To configure Advanced General Protocol parameters:
1. Open the Advanced Parameters page (Configuration tab > VoIP menu > SIP Definitions submenu > Advanced Parameters).
2. From the ‘Enable Digit Delivery to IP’ drop down list, Select ‘Enable’
3. Click submit to apply the changes
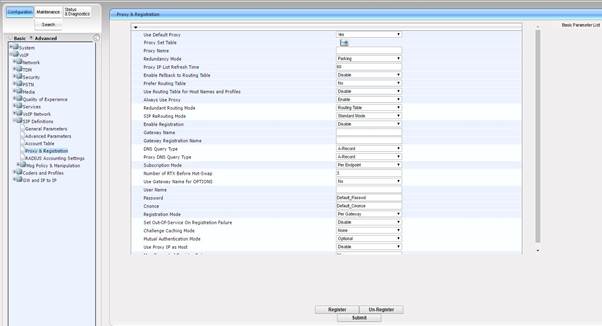
Configure the Proxy and Registration
To configure the Proxy and Registration parameters:
1. Open the Proxy & Registration page (Configuration tab > VoIP menu > SIP Definitions submenu > Proxy & Registration).
2. From the ‘Use Default Proxy’ drop down list, Select ‘Yes’
3. From the ‘Always Use Proxy’ drop down list, Select ‘Enable’
4. Click Submit to apply your changes.
5. Click the Register buttons to save your changes and register the device to a Proxy/Registrar.
Configuring Coders
The Codes page allow you to configure up to 10 voice coders for the devise to use. Each codes can be configured with packetization time (ptime), rate, payload type and silence suppression.
The first coder in the table has the highest priority and is used by the device whenever possible. If the remote side cannot use the first coder, the device attempts to use the next coder in the table, and so on.
To configure the device’s coders:
1. Open the Coders page (Configuration tab > VoIP menu > Coders and Profiles submenu > Coders).

2. From the ‘Coder Name’ drop down list, select G.711A-law
3. From the ‘Coder Name’ drop down list, select T.38
4. Click Submit to apply your changes
5. Click on the ‘BURN’ option at the top of the web page to save changes to flash memory.
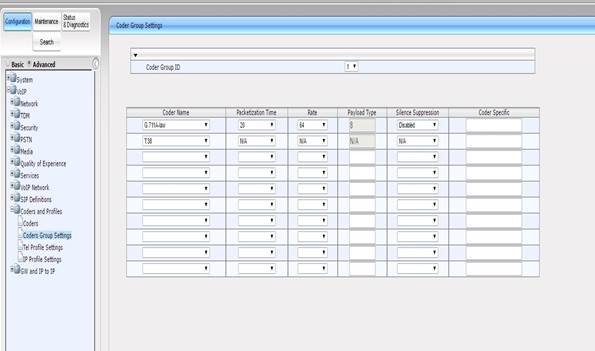
To Configure Coders Groups:
1. Open the Coder Group Settings page (Configuration tab > VoIP menu > Coders and Profiles submenu > Coders Group Settings).
2. From the ‘Coder Name’ drop down list, select G.711A-law
3. From the ‘Coder Name’ drop down list, select T.38
4. Click Submit to apply your changes
Configure Tel Profiles
To configure the Tel Profile settings:
1. Open the Tel Profile Settings page (Configuration tab > VoIP menu > Coders and Profiles submenu > Tel Profile Settings).
2. Click on the ‘Add’ button which gives you the option to add a new row.
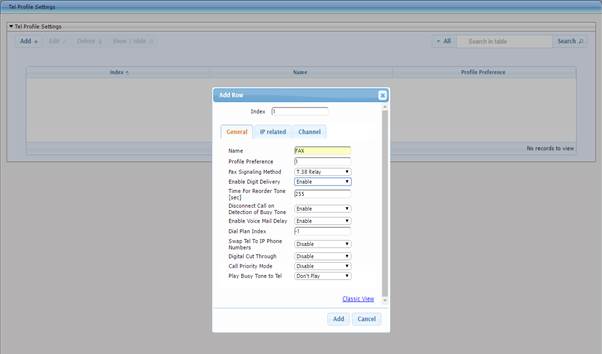
3. On the General tab, in the ‘Profile Name’ field, enter an arbitrary name that enables you to easily identify the Tel Profile (e.g. FAX).
4. From the ‘Enable Digit Delivery’ drop down list, select ‘Enable’.
5. Click Add to apply your changes
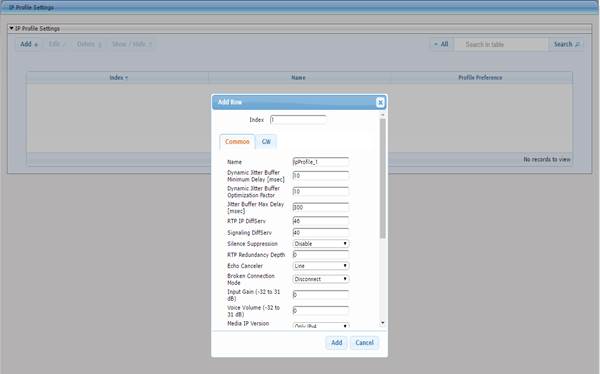
Configure IP Profile
To configure the IP Profile Settings:
1. Open the Tel Profile Settings page (Configuration tab > VoIP menu > Coders and Profiles submenu > IP Profile Settings).
2. Click on the ‘Add’ button which gives you the option to add a new row.
3. On the Common tab, in the ‘Name’ field, enter an arbitrary name that enables you to easily identify the IP Profile (e.g. IpProfile_1)
4. On the GW tab, from the ‘Second Tx DTMF Option’ dropdown list, select ‘NOTIFY’.
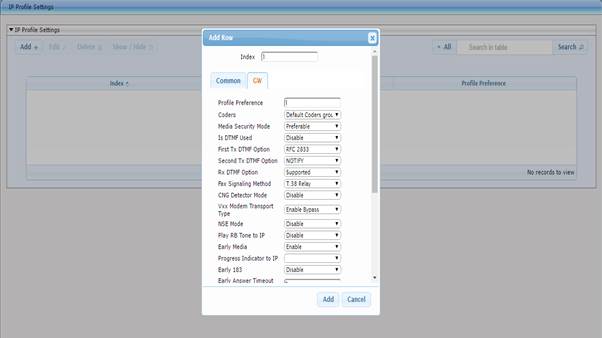
5. Click on Add to apply the settings.
Configure the Trunk Group for local PSTN
To configure the Trunk Group:
1. Open the Trunk Group Table page (Configuration tab > VOIP menu > Gateway submenu > Trunk Group > Trunk Group
2. Configure the Trunk Group ID #1 (as shown in the figure below):
· From the ‘From Trunk’ and ‘To Trunk’ drop down lists, select 1 to indicate Trunk 1 for this trunk Group
· In the ‘Channels’ fields, enter the Trunk channels or ports assigned to the Trunk Group (e.g. 1-2 for BRI)
· In the ‘Trunk Group ID’ field, enter “1” as the ID for this Trunk Group.
· In the ‘Tel Profile Name’ dropdown list, select the Profile name (e.g. FAX)
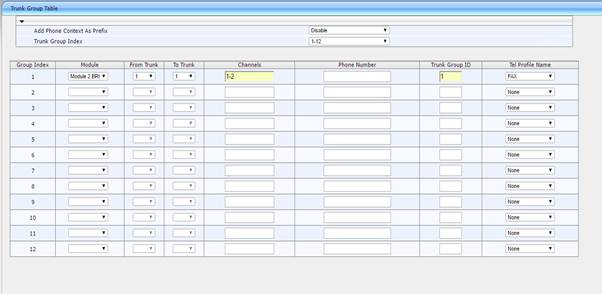
3. Please add a line for each ISDN2 line connected to the unit. The image above shows a configuration for 1 ISDN2 lines connected, giving a total of two FOIP channels
4. Click Submit to apply your changes
Configure Tel to IP Routing
To configure Tel to IP routing:
1. Open the Tel-to-IP Routing page (Configuration tab > VoIP menu > Gateway submenu > Routing submenu > Tel to IP Routing)
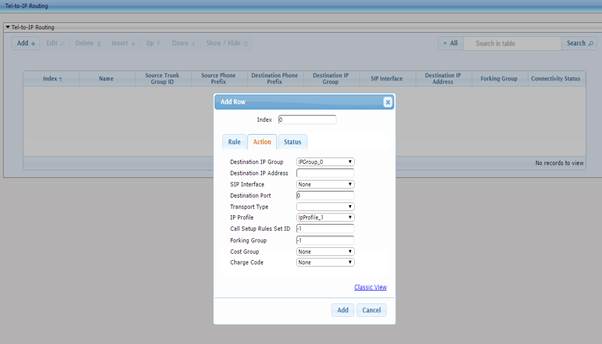
2. Click on the ‘Add’ button which gives you the option to add a new row.
3. On the Action tab, in the ‘Destination IP Group’ dropdown list, select IPGroup_0
4. In the ‘IP Profile’ dropdown list, select the IP Profile name (e.g. IpProfile_1)
5. Click on Add to apply settings
Configure IP to Trunk Group Routing
To Configure IP to Trunk Group routing:
1. Open the IP-to-TrunkGroup Routing page (Configuration tab > VoIP menu > Gateway submenu > Routing submenu > IP to Trunk Group Routing)
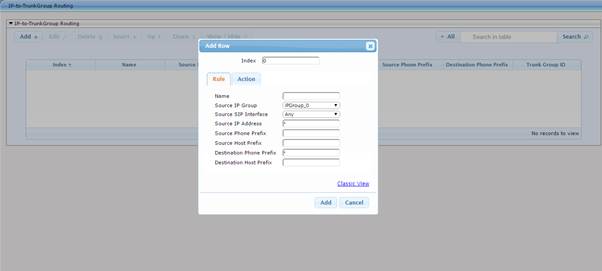
2. Click on the ‘Add’ button which gives you the option to add a new row.
3. On the Rule tab:
· In the ‘Source IP Group’ dropdown list, select the IP Group name (e.g. IPGroup_0)
· In the ‘Source IP Address’ field, enter (*)
· In the ‘Destination Phone Prefix’, enter (*)
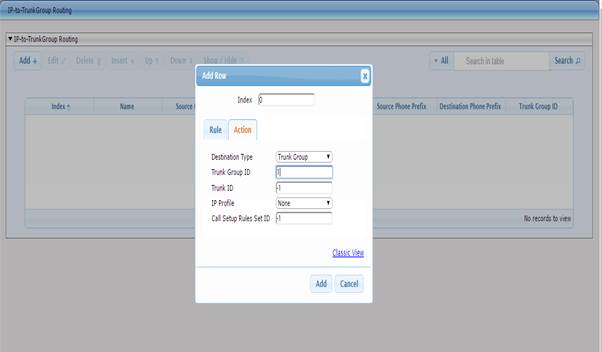
4. On the Action tab:
· In the ‘Trunk Group ID’ field, enter “1”.
Configure DTMF and Dialing
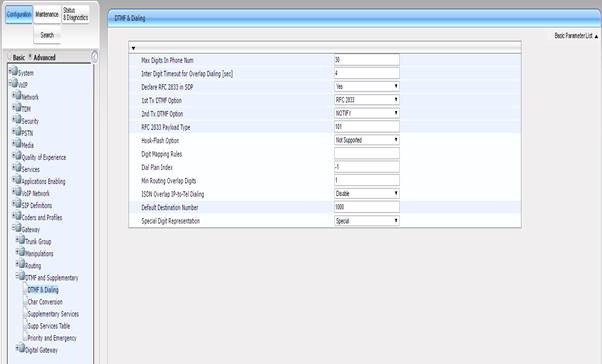
The DTMF and Dialing page s used to configure parameters associated with dual-tone multi-frequency (DTMF) and dialing.
To Configure the DTMF and dialing parameters:
1. Open the DTMF & Dialing page (Configuration tab > VoIP menu > Gateway submenu > DTMF & Supplementary submenu > DTMF & Dialing).
2. Configure the parameters as required.
· In the ‘Max Digit In Phone Num’ field, enter “30”.
· From the ‘1st Tx DTMF Option’ dropdown list, select ‘RFC 2833’.
· From the ‘2nd Tx DTMF Option’ dropdown list, select ‘NOTIFY’.
3. Click Submit to apply your changes.
4. Click on the ‘BURN’ option at the top of the web page to save changes to flash memory.
Last updated:9th February 2018 (JA/NT)
Keywords: SR140 FoIP